I still remember the first time I tried to make a “rustic American flag” out of reclaimed wood planks. I had watched exactly one YouTube video, bought a bundle of pallet wood from the flea market, and figured — how hard could it be?
Pretty hard, it turns out.
The stripes were crooked. The star section looked like it belonged on a kindergarten art project. And I had somehow managed to stain my kitchen table a permanent shade of colonial blue. My husband just stood in the doorway and didn’t say a word, which honestly said everything.
But here’s the thing — I didn’t quit. I went back, I learned, I adjusted, and by my third attempt, that flag was hanging proudly on our front porch. Neighbors stopped to ask where I bought it.
That’s the magic of Americana crafts. They look complicated, but once you understand a few basic techniques and know which projects are actually beginner-friendly, the whole thing clicks. There’s a reason this style has had such a long, lasting hold on home decor — it’s warm, it’s personal, and it tells a story.
So if you’ve been scrolling Pinterest for hours, saving Americana ideas and then never actually starting because you don’t know where to begin — this is your guide. These are the ten projects I’d recommend to any beginner, based on what actually works and what I wish someone had told me first.
What Makes Something “Americana” Anyway?
Before we dive in, let me quickly explain what I mean by Americana crafts, because it’s a style that sometimes gets confused with “patriotic” decor or even “farmhouse” style.
Americana isn’t just red, white, and blue. It’s a broader aesthetic that draws from early American folk art traditions — think hand-painted signs, distressed wood, primitive patterns, vintage lettering, and homespun textures. It’s got warmth to it. It feels like a country kitchen, a barn sale, an old general store.
Yes, stars and stripes show up a lot. But so do roosters, sunflowers, homey quotes in distressed fonts, mason jars, and weathered wood textures. It’s a style that feels handmade on purpose.
Okay, now let’s get into it.
1. Distressed Wood Sign with a Simple Quote

This is where I always tell beginners to start, because the materials are cheap, the skill ceiling is low, and the results look genuinely impressive.
What you need: A pine board from any hardware store (a 1×6 or 1×8 works great), acrylic craft paint in white and black, sandpaper (120 and 220 grit), a sponge brush, a pencil, and a printer if you want to trace your lettering.
How to do it:
Start by lightly sanding your board to smooth out any rough edges. Then paint the whole surface with two coats of white or cream acrylic paint, letting it dry fully between coats.
Here’s the trick that took me too long to learn: distressing is easier when you do it after painting, not before. Once your paint is dry, take your 220-grit sandpaper and lightly rub along the edges and any knots or grain lines. The wood underneath will show through, and it instantly looks aged.
For the lettering, I print my quote in a bold font at the right size, tape it to the board, then slide graphite paper underneath and trace the letters. This transfers the outline onto the wood so I can paint it freehand without having to be a calligrapher.
A thin round brush and black paint for the letters, and you’re done.
What I got wrong at first: I tried to skip the graphite transfer step and just “eyeball” the letters. Do not do this. It will not look good. Graphite paper costs about $3 at any craft store, and it genuinely changes the game.
Great quotes to start with: “Home Sweet Home”, “Gather”, “Bless This Home” — short and easy to letter.
2. Mason Jar Centerpiece with Burlap and Twine
If you’ve never done a single Americana craft in your life, this one will make you feel like you absolutely have.
It requires zero artistic skill and takes about 20 minutes. And yet somehow it always ends up looking like something from a Country Living photoshoot.
What you need: Mason jars in any size (Ball brand wide-mouth jars are classic), burlap ribbon or fabric, jute twine, scissors, a hot glue gun, and whatever you want to put inside — dried flowers, sprigs of lavender, battery-powered fairy lights, or even just some sand and a candle.
How to do it:
Wrap a strip of burlap ribbon around the middle of your mason jar and secure it with a dot of hot glue. Tie jute twine on top of the burlap layer and finish it with a small bow. That’s genuinely most of it.
You can punch out a small tag from brown kraft paper, stamp or write a little word on it (“Farm Fresh,” “Homemade,” “Made with Love”), and loop it onto the twine for extra charm.
Where beginners go wrong: Overcomplicating it. I’ve seen people add three layers of ribbon and a dozen embellishments, and suddenly it looks messy rather than rustic. The beauty of this style is restraint. Two materials, well-placed, always look better than seven things competing for attention.
Group them in threes of different heights for a display that looks intentionally designed.
3. Americana Wreath with Denim and Burlap
Wreaths are one of those crafts that look like they require a lot of skill but actually break down into simple, repetitive steps. Once you understand the basic technique, you can make one in an afternoon while watching TV.
What you need: A wire wreath frame (12 or 14 inches is great for beginners), strips of burlap fabric in natural and red, strips of denim fabric (old jeans work perfectly), star-shaped buttons or metal stars for embellishment, and possibly a small American flag pick.
How to do it:
Cut your fabric into strips about 6 inches long and 2 inches wide. You’ll need quite a few — around 150 to 200 strips for a full wreath.
To attach each strip, fold it in half and loop it through one of the wire frame sections, then pull the ends through the loop (exactly like making a lark’s head knot if you’ve ever done any macramé). Push each strip close to the previous one.
Alternate your burlap and denim strips randomly for a good mix of texture. Once the frame is full, fluff the strips outward, and you have a wreath.
Add your star embellishments with hot glue and a wire ribbon in red to hang it.
My honest mistake on my first wreath: I used fabric strips that were too short, and the wreath looked flat and sparse. Longer strips (at least 6 inches) fluff out better. Don’t trim your strips down trying to be economical — it genuinely affects the finished look.
4. Painted Terracotta Pot with Americana Motifs
This one was a happy accident for me. I was trying to find something to do with a pile of plain terracotta pots from the dollar store and ended up down a rabbit hole of folk art painting. Three hours later, I had five painted pots and a new obsession.
The folk art style — simple flowers, checks, and stars in a muted Americana palette — is actually very forgiving for beginners because the primitive look is part of the aesthetic. If your brushstrokes are a little wobbly, that’s not a mistake; that’s character.
What you need: Plain terracotta pots, acrylic craft paints in barn red, cream, navy blue, and forest green, a round brush and a flat brush, and matte sealant spray.
How to do it:
Paint the whole pot with a cream base coat and let it dry. Then use a pencil to lightly sketch your design — a simple folk flower, a star pattern, a checkered band around the rim.
Folk flowers are genuinely one of the easiest designs to pull off. Paint a center circle, then add simple petals around it using the flat side of your brush (just press and lift). Add a few leaves. Add a tiny star somewhere. Done.
Once your design is dry, spray the whole pot with matte sealant to protect it from water if you’re using it outdoors or for actual planting.
Things I learned: Thin your paint just slightly with water so it flows off the brush smoothly. Too thick and it drags and clumps. And always do two coats — terracotta soaks up that first layer like a sponge.
5. Fabric-Strip Rag Wreath (No Sew!)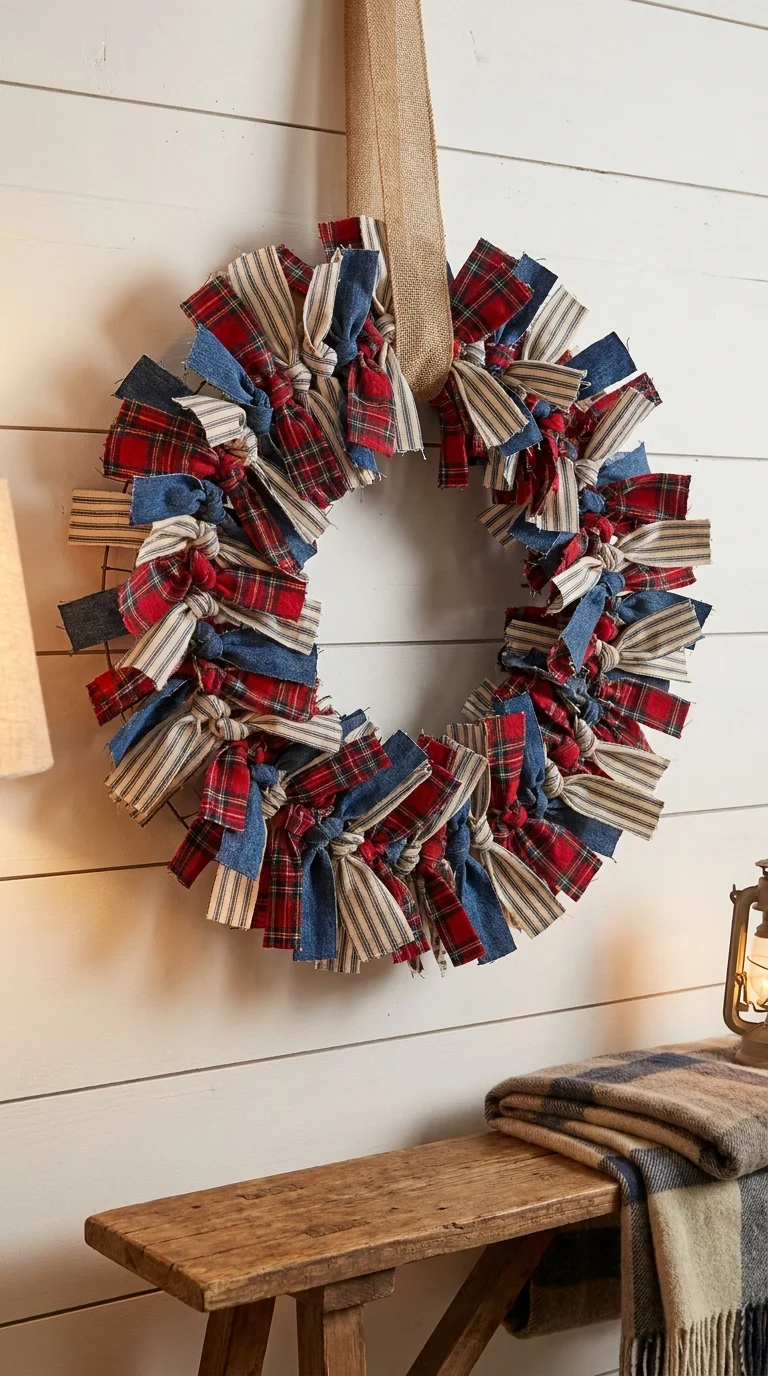
I know I already mentioned one wreath, but this version uses a completely different technique and honestly looks even more rustic and cozy. It’s also entirely no-sew, which means if you don’t own a sewing machine or don’t want to deal with a needle and thread, this is your wreath.
Use a foam wreath form instead of a wire one, and wrap fabric strips around it by folding and pinning or tucking them in. Old flannel shirts, denim scraps, and cotton fabric in Americana patterns (ticking stripe, buffalo check, bandana print) all work beautifully together.
This is a great project for using up fabric scraps or hitting the remnant bin at the fabric store. Mix textures and patterns confidently — that patchwork, layered quality is exactly what makes it look intentional.
6. Americana Memory or Inspiration Board
This is less of a “craft” and more of a curated display, but it’s deeply rooted in the American tradition of making something meaningful with what you have.
Take a simple cork board or a piece of plywood and cover it with burlap. Then use it to display things that feel personal and Americana in spirit — vintage postcards, seed packet art, old family photos, handwritten recipes, pressed flowers, small flags, tags from homemade jam.
The key to making this look beautiful rather than cluttered is choosing a color palette and sticking to it. Cream, navy, red, and kraft brown are a classic combination that holds everything together visually.
Pin things slightly overlapping, at angles — not in a perfect grid. The casual, “gathered over time” feeling is what gives this kind of display its warmth.
7. Hand-Stamped Flour Sack Towels
Flour sack towels have become one of my favorite things to make and gift. They’re inexpensive, they look beautiful in a kitchen, and people genuinely love receiving something handmade that they’ll actually use.
What you need: Plain flour sack towels (a 3-pack costs about $5 at Walmart or Target), fabric ink pads or fabric paint, rubber stamps (look for star stamps, sunflower stamps, or Americana word stamps at Hobby Lobby or Michaels), and a heat gun or iron to set the ink.
How to do it:
Lay your towel flat on a hard surface and smooth out any wrinkles. Press your stamp firmly onto the ink pad, then press it onto the towel with even, firm pressure — don’t rock it or it’ll smear.
Lift straight up.
Repeat your stamp pattern across the towel however you like. A row of stars across one end. A border of checkered stamps. A single large sunflower in the center. Let it dry, then heat-set it according to your ink’s instructions (usually a hot iron held over the stamp for about 30 seconds).
What to watch out for: Stamping on fabric is less forgiving than paper because the fibers absorb ink differently. Do a test stamp on a scrap piece of fabric first to see how the design transfers. If the ink is too dry, add a tiny bit of water to the pad. If it’s too wet, it’ll bleed.
These make incredibly sweet gifts packaged in a mason jar tied with twine.
8. Primitive Star Pillow Cover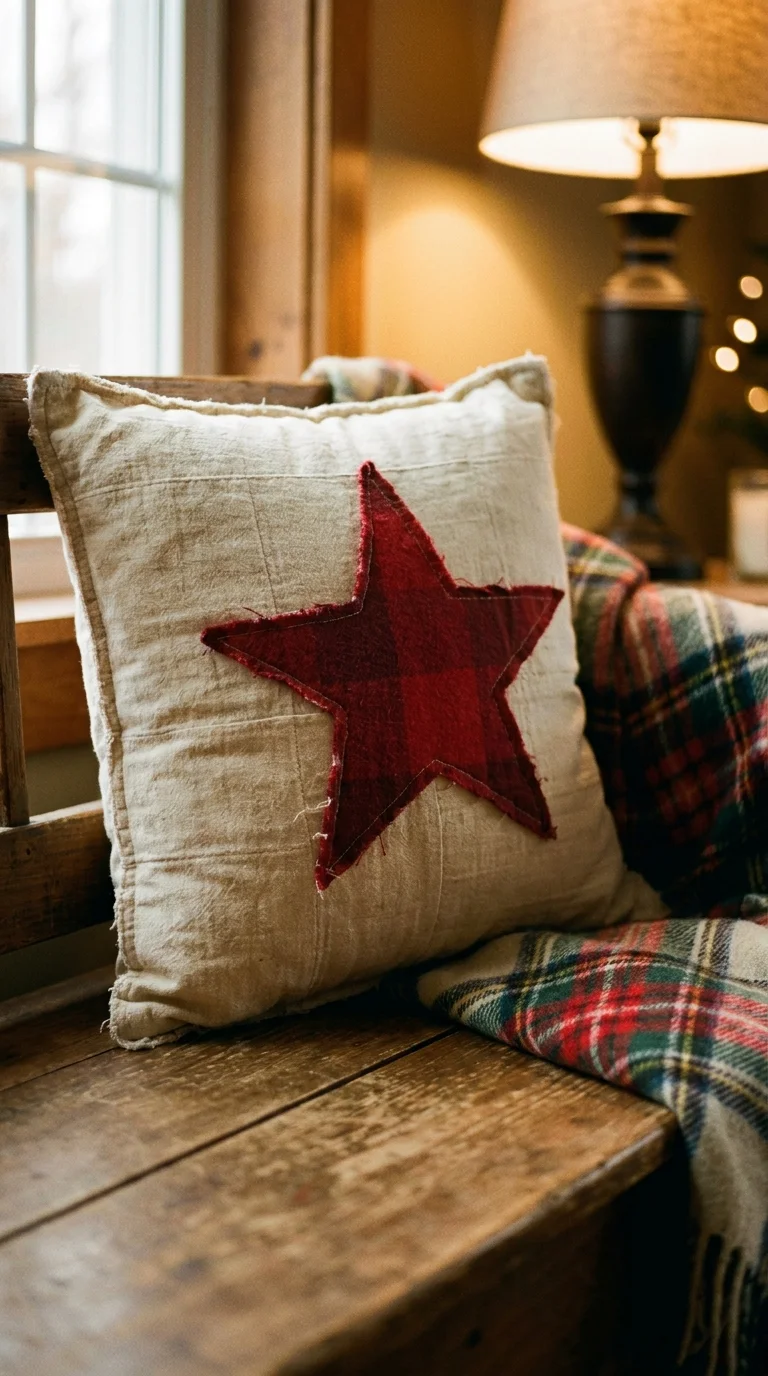
Americana style is very much rooted in early American quilting and textile traditions, and this project nods to that heritage without requiring you to actually quilt anything.
You’re just making a simple pillow cover — two pieces of fabric sewn together (or even fabric-glued if you don’t sew) — with a large star appliqué on the front.
Fabric combinations that look great: Red ticking stripe for the back, navy buffalo check for the front, or a cream muslin front with a red flannel star. Keep it simple, and the “primitive” quality of it is exactly right.
Cut your star shape from a template (print one online, they’re everywhere), pin it onto your pillow front, and either machine stitch or hand blanket stitch around the edges. A raw, slightly frayed edge on the star appliqué is not a mistake — it’s part of the look.
This project is also a great way to use up fat quarters from the fabric store, which are inexpensive little bundles usually sold for about $2 to $3 each.
9. Americana-Style Painted Rocks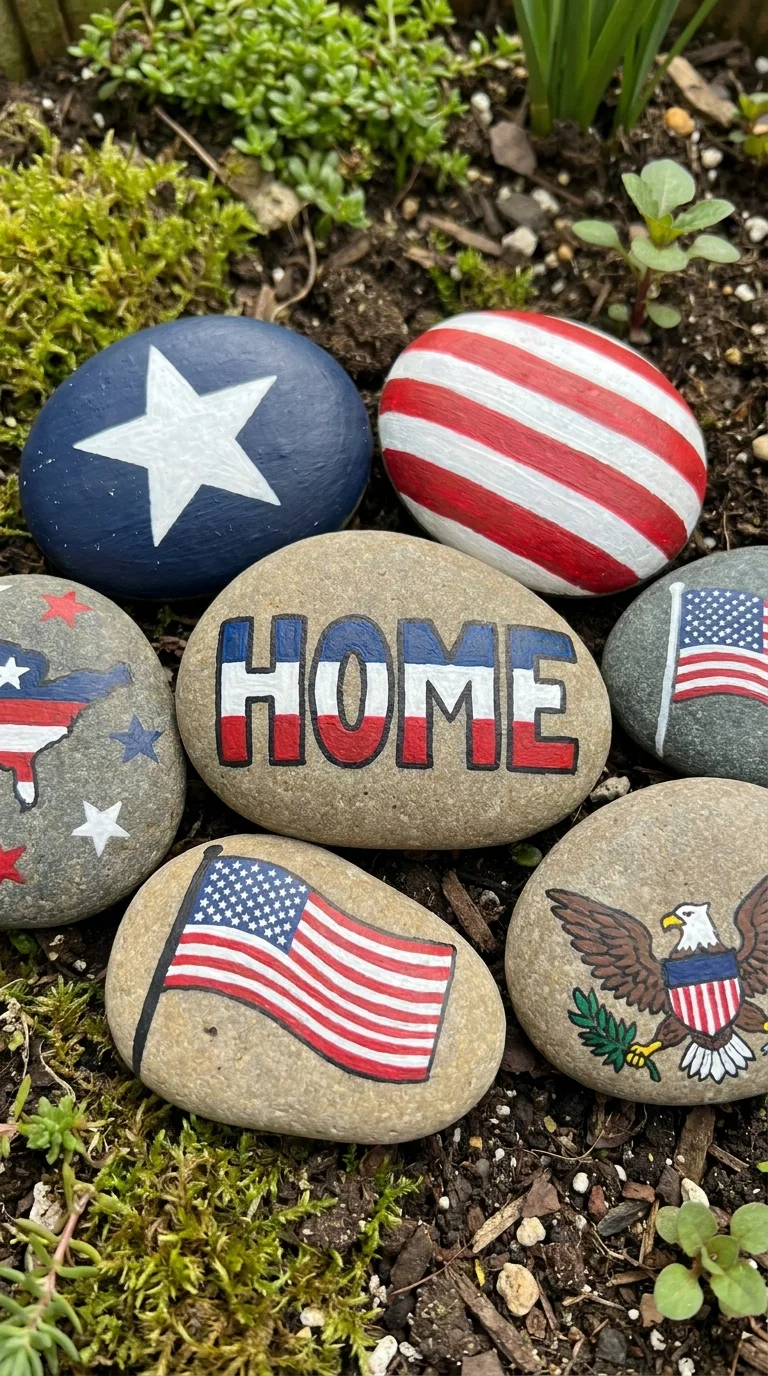
This one sounds a little kitschy, but hear me out — done well, painted rocks in an Americana style look genuinely charming in a garden, along a walkway, or clustered in a bowl as a centerpiece.
The key is choosing the right rocks (smooth and flat work best), using the right paints (outdoor acrylic), and keeping your designs simple and bold.
Stars are perfect for rocks. A white star on a navy background. A red stripe pattern. A simple flag face. Folk flowers. Even just the word “HOME” in a chunky stencil font.
Use a pencil to sketch your design lightly on the rock first, then fill in with paint using a small flat brush. Two coats for solid coverage. Finish with outdoor Mod Podge or a clear outdoor sealant so your design survives rain and sun.
The imperfections in hand-painted rocks are what make them look special. If the star isn’t perfectly geometric, good. That’s why it reads as handmade and charming rather than mass-produced.
10. Wooden American Flag (Yes, Even Beginners Can Do This)
I saved this one for last because it’s the project I failed at first and eventually got right — and because it’s genuinely one of the most beautiful things you can put on a wall or fence.
Let me give you the beginner-friendly version, not the “I have a table saw and twelve tools” version.
The easy approach: Buy pre-cut, pre-sanded craft plywood panels from a craft store like Hobby Lobby (they usually sell them in the flag shape or in rectangles you can arrange). You don’t need reclaimed barn wood or a workshop full of equipment.
Lay your boards out in the flag proportions — seven red stripes and six white stripes, with a blue canton (rectangle) in the upper left for the stars.
Painting step by step:
First, stain all the boards in a light wood stain (Early American by Varathane is a classic shade) and let them dry fully. This gives them that warm, aged look.
Then tape off the stripe sections and paint alternating stripes in barn red and cream/white. Remove the tape before the paint dries completely to get clean edges.
For the blue canton, mix a muted navy — not a bright royal blue, but a more colonial, slightly grey-blue tone. This makes the finished flag look authentically aged rather than fresh off a flagpole.
For the stars, the easiest method is a star stamp dipped in white paint. A small foam star stamp from any craft store works perfectly. Press firmly and consistently and you’ll get a beautiful result.
Assembling: If you’re working with individual strips of wood, you can attach them to a backing board (a thin piece of plywood) with wood glue or small brad nails. Or if you have them pre-cut as one piece, you’re already there.
Finish with a light sanding of the edges to distress them slightly, and optionally a thin wash of diluted white paint over the whole thing (called a whitewash or dry brush technique) to tie all the colors together and add that heirloom look.
Hang it and stand back.
Common Mistakes Beginners Make with Americana Crafts
After doing dozens of these projects and helping friends get started, here are the patterns I keep seeing:
Using colors that are too bright. Real Americana style uses muted, faded, aged colors — not the vivid primary red, white, and blue you’d see on a plastic decoration. Add a touch of brown or grey to your paints to age them down. It makes a dramatic difference.
Skipping the prep. Sanding, priming, base coating — these feel like tedious steps you want to skip to get to the fun part. Don’t. The prep is why the finished project looks good.
Trying to be too perfect. Americana is a folk art tradition. Wonky brushstrokes, imperfect stars, slightly crooked lettering — these are features, not bugs. The more you try to make it look machine-made, the less authentically handmade it looks.
Buying the wrong paint. Cheap craft paint works completely fine for most of these projects. But if you’re doing something that will live outdoors (a garden rock, a porch sign), you need outdoor-rated paint or a sealant on top. Regular craft acrylic will flake and fade within a season.
Not letting things dry between coats. Impatience is the #1 enemy of a clean finish. If you paint over a coat that isn’t dry, you get streaking, lifting, and muddied colors. Give it time.
Getting Your Supplies Without Breaking the Budget
You don’t need to spend a lot of money to get started with Americana crafts. Here’s how I keep costs down:
Hobby Lobby runs 40% off one regular-priced item coupons every single week, and their app makes it easy to grab before checkout. Their DecoArt Americana acrylic paint line is excellent quality and costs about $1.50 per bottle.
Michaels does the same kind of weekly coupon, and their store brand paint and brushes are solid for beginner projects.
For wood, check your local Facebook Marketplace or Craigslist for free or cheap pallet wood, or visit a hardware store and look at their “cull lumber” section — warped or slightly damaged boards are sold at a steep discount and often sand right back into shape.
Dollar Tree is legitimately a goldmine for this style: mason jars, wooden frames, terra cotta pots, burlap ribbon, twine, and seasonal Americana items are all regularly in stock.
A Few Final Thoughts
What I love most about Americana crafts is that they’re rooted in the idea of making something meaningful from simple materials. There’s a long American tradition of turning ordinary things — wood, fabric scraps, old jars — into objects that make a house feel like a home.
You don’t need to be an artist. You don’t need an expensive craft room or a Pinterest-perfect setup. You need a flat surface, some basic supplies, and the willingness to try something that might not be perfect the first time.
My crooked flag on the first attempt is still propped up in my garage. I look at it sometimes and feel genuinely fond of it, because it’s proof that the next attempt — and the one after that — gets better.
Start with the mason jar centerpiece if you want something with zero risk and immediate results. Try the distressed sign when you want to feel a little more creative. And when you’re ready for a real challenge with a real payoff, build that flag.
It’s worth it. I promise.
Have you tried any of these Americana crafts? I’d love to hear which one you’re starting with — drop it in the comments below.

Shahid Nawaz is a home and garden content writer at Garden Skillz with over 4 years of experience researching and writing about gardening, plant care, and DIY home improvement. He specializes in turning complex horticultural topics into practical, easy-to-follow guides for beginners and experienced growers alike. Shahid has written extensively on flowering plants, indoor greenery, and seasonal garden care.