My balcony faces south. Full, unforgiving, blazing south. In the summer, by 11 a.m., it’s basically a frying pan. I learned this the hard way after spending a good chunk of money at the garden center one spring, filling beautiful terracotta pots with petunias, impatiens, and a really lovely fern that the label said was “versatile.”
Within three weeks, the fern was toast. The impatiens looked like they were melting. And I was standing there with my watering can, feeling like the world’s worst plant parent.
But here’s the thing — once I stopped fighting my south-facing balcony and started working with it, everything changed. Full sun isn’t a curse. It’s actually an advantage if you know what to do with it. Your small space can look absolutely stunning — overflowing with color, texture, and life — if you pick the right plants and set up your planters the right way.
This article is everything I wish someone had told me before I wasted that money on those impatiens.
What “Full Sun” Actually Means (And Why It Matters for Small Spaces)?
Before I get into the ideas, let me clear something up because this confused me for the longest time.
“Full sun” means your space gets at least 6 hours of direct sunlight per day. Some spots get 8, 10, even 12 hours — mine gets close to 10 in peak summer. The distinction matters because plants labeled “full sun” at the garden center are bred to thrive in those conditions, not just survive them.
In a small space — whether that’s a balcony, a tiny patio, a narrow side yard, or a fire escape you’ve somehow convinced yourself is a garden (no judgment, I’ve been there) — you don’t have room to waste a planter on a struggling plant. Every pot needs to earn its spot.
That’s the mindset shift that made everything click for me. Small space gardening in full sun is actually strategic. You choose your plants intentionally, you think about height, color, and seasonal interest, and you make every single inch count.
Idea 1: The Thriller, Filler, Spiller Method — But Done Right for Full Sun
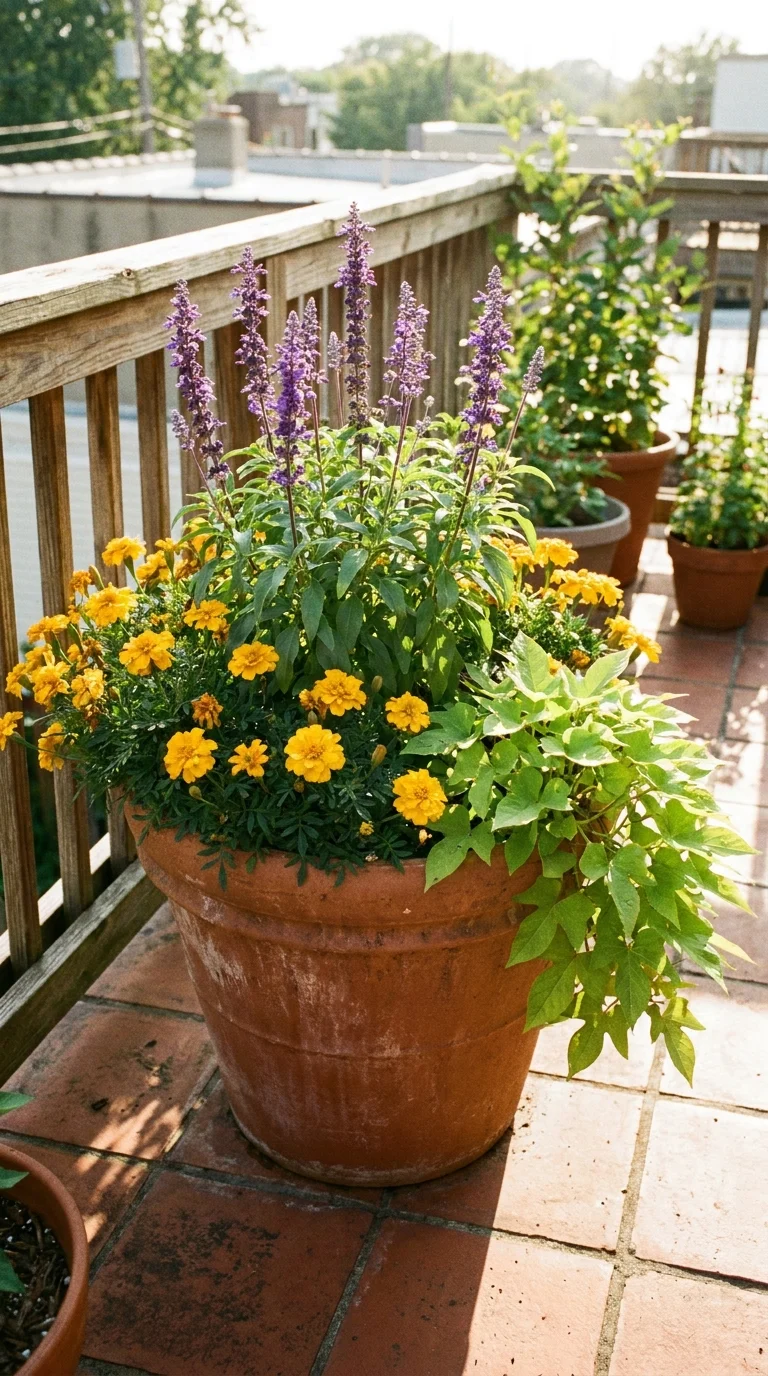
You’ve probably heard of this formula. Most garden blogs talk about it. But what most of them don’t tell you is that the classic plant recommendations for this method are often shade or part-sun plants. You have to swap them out completely for full sun conditions.
Here’s the basic concept: every planter should have a thriller (a tall, dramatic centerpiece), a filler (medium plants that fill in around it), and a spiller (something that trails over the edge of the pot and cascades downward). When you nail this in a small space, even one single pot looks like a professional floral arrangement.
For full sun, here’s what actually works:
Thrillers (tall + sun-loving):
- Salvia (especially the tall “Black and Blue” variety — hummingbirds lose their minds over it)
- Ornamental grasses like Purple Fountain Grass
- Tall Zinnias
- Cleome (spider flower) — underrated and gorgeous
Fillers (medium + sun-loving):
- Lantana — this is my ride-or-die full sun plant. It blooms from May through October and laughs at heat.
- Portulaca (moss rose) — looks delicate, is basically indestructible
- Marigolds — yes, classic, but they genuinely work
- Calibrachoa (million bells) — like mini petunias that handle heat way better than actual petunias
Spillers (trailing + sun-loving):
- Sweet potato vine (the “Marguerite” yellow-green variety is stunning)
- Creeping Jenny — golden and cheerful
- Bacopa — tiny white flowers, cascades beautifully
- Trailing verbena
My mistake: I used to put the spiller plant last and shove it in wherever it fit. Wrong. Plant your thriller first in the center or slightly toward the back, then build your fillers around it, then tuck the spillers right at the edges so they have room to actually trail over the side. It sounds obvious, but it took me an embarrassingly long time to get this right.
A 14-inch or 16-inch pot is your sweet spot for this method if you’re working in a small space. Go too small, and the plants compete too much; go too big, and the pot is impossible to move if you need to rearrange.
Idea 2: A Dedicated Herb Planter That Does Double Duty
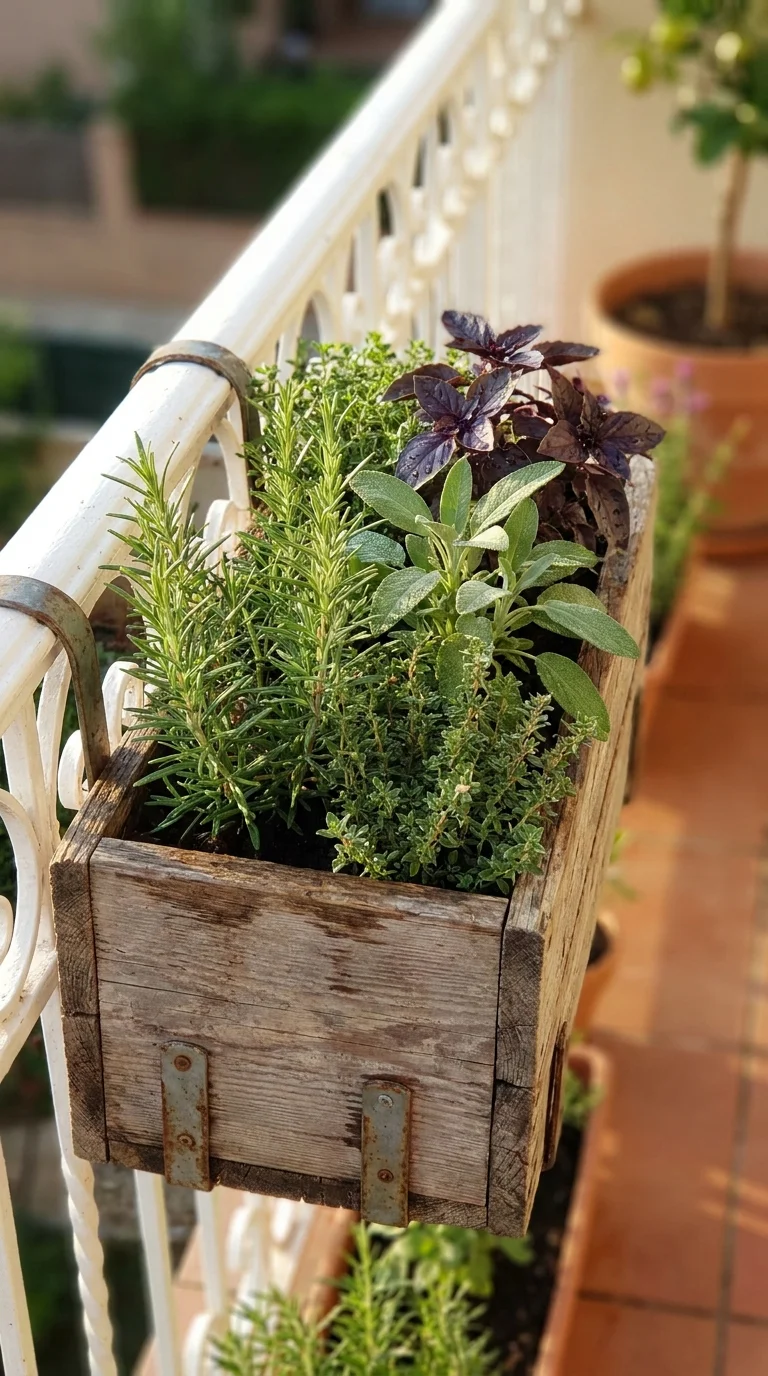
I know, I know. “Grow herbs” is the most basic garden advice on the internet. But hear me out, because there’s a specific way to do this in a small full-sun space that makes it actually practical and beautiful at the same time.
Most herbs are full-sun plants. Basil, rosemary, thyme, oregano, sage — they all want that heat. And in a small space, a well-planted herb container does something flowers alone can’t: it gives you something to actually use.
Here’s the setup I landed on after a few years of trial and error:
The “Mediterranean Herb Planter” approach:
Get a long rectangular planter — at least 24 inches long if you can. The rectangular shape is key for small spaces because you can line it up along a railing, a wall, or the edge of a step without eating into your floor space.
Plant it like this (back to front):
- Back row: Rosemary (upright variety) — this becomes your thriller. It gets tall and woody and looks architectural.
- Middle: Sage and thyme — they stay medium height and bush out nicely.
- Front/edges: Trailing thyme or prostrate rosemary — these spill over the front beautifully.
Add a few sprigs of purple basil tucked in for color contrast. It’s stunning.
The practical upside: on a hot evening when you’re cooking, you walk out, snip a few herbs, and come back in. It’s that “I live in a magazine” moment that small-space gardening is all about.
Critical tip: Herbs in full sun dry out fast. I have a long rectangular planter like this on my balcony railing, and in August, I sometimes need to water it twice a day. I eventually added a self-watering liner insert (you can find these on Amazon for most standard planter sizes), and it made a huge difference. The reservoir at the bottom keeps the roots from completely drying out between waterings.
Idea 3: Go Vertical — The Railing Planter Stack

In a small space, the floor is your most valuable real estate. Once I started thinking vertically, my balcony went from feeling cramped to feeling like a proper little garden room.
Railing planters are the obvious starting point. These are the rectangular pots with a bracket that hooks over a balcony or deck railing. They come in plastic, metal, and wood-look finishes. For full sun, I’d steer you toward lighter-colored planters (white, light gray, or terracotta) rather than dark ones — dark containers absorb heat and can literally cook your roots in intense summer sun.
But here’s the upgrade: Don’t just do one row of railing planters. Do two rows — one on top of the railing, and one hanging just below it on the outside (if your building allows it) or clipped to the outside-facing side of the railing.
This creates a cascading wall of plants that looks incredible from both inside and outside.
For the top (inside-facing) planter, go with upright sun lovers — compact Salvia, dwarf Marigolds, compact Zinnias.
For the lower or outside planter, go full spiller — trailing Petunias (the Wave variety handles sun better than regular petunias), Calibrachoa, or Verbena.
What I use: I personally use the Lechuza Balconera planters for my railing setup. They’re not cheap, but they have a built-in water reservoir, which is a game-changer for full sun situations. I check the reservoir every 2-3 days in summer rather than watering daily. Worth every penny.
Mistake I made: I once installed railing planters that were too heavy when filled with wet soil. The railing wasn’t rated for that weight, and it was genuinely unsafe. Always check your railing’s weight capacity. Switching to a lightweight potting mix (more on that in a minute) and using plastic or resin planters instead of ceramic helped significantly.
Idea 4: A Pollinator Corner — One Planter That Attracts Everything

This is the planter idea that honestly changed how I feel about my outdoor space. I stopped thinking about my balcony as just a decoration project and started thinking about it as a little ecosystem.
A dedicated pollinator planter in full sun is essentially a wildlife magnet. Butterflies, bees, hummingbirds — they’ll find it within days. And the plants that attract pollinators? They absolutely thrive in full sun. It’s almost like these plants were designed for exactly the conditions you’re working with.
My go-to pollinator planter combo for full sun:
- Lantana — I keep coming back to this plant. It’s practically bulletproof in heat, blooms nonstop, and butterflies are absolutely obsessed with it. Get a trailing variety and a mounding variety and mix them.
- Salvia “Black and Blue” — hummingbirds go wild for this. It has deep cobalt blue flowers on tall spikes, and it reseeds itself if you let it.
- Echinacea (Coneflower) — full sun, drought-tolerant once established, and the goldfinches eat the seed heads in fall.
- Agastache (hyssop) — smells amazing, bees adore it, handles heat extremely well.
- Catmint — low maintenance, silvery foliage, soft purple flowers. If you deadhead it once in midsummer, it blooms again.
Use a large pot for this one — at least 16-18 inches in diameter. The more root space these plants have, the bigger and more productive they’ll get.
This is also the planter I take the most photos of. On a summer morning with a cup of coffee, watching a bumblebee work its way through the salvia is one of the best small-space garden experiences I’ve had.
Idea 5: The Drought-Tolerant “Desert Chic” Planter
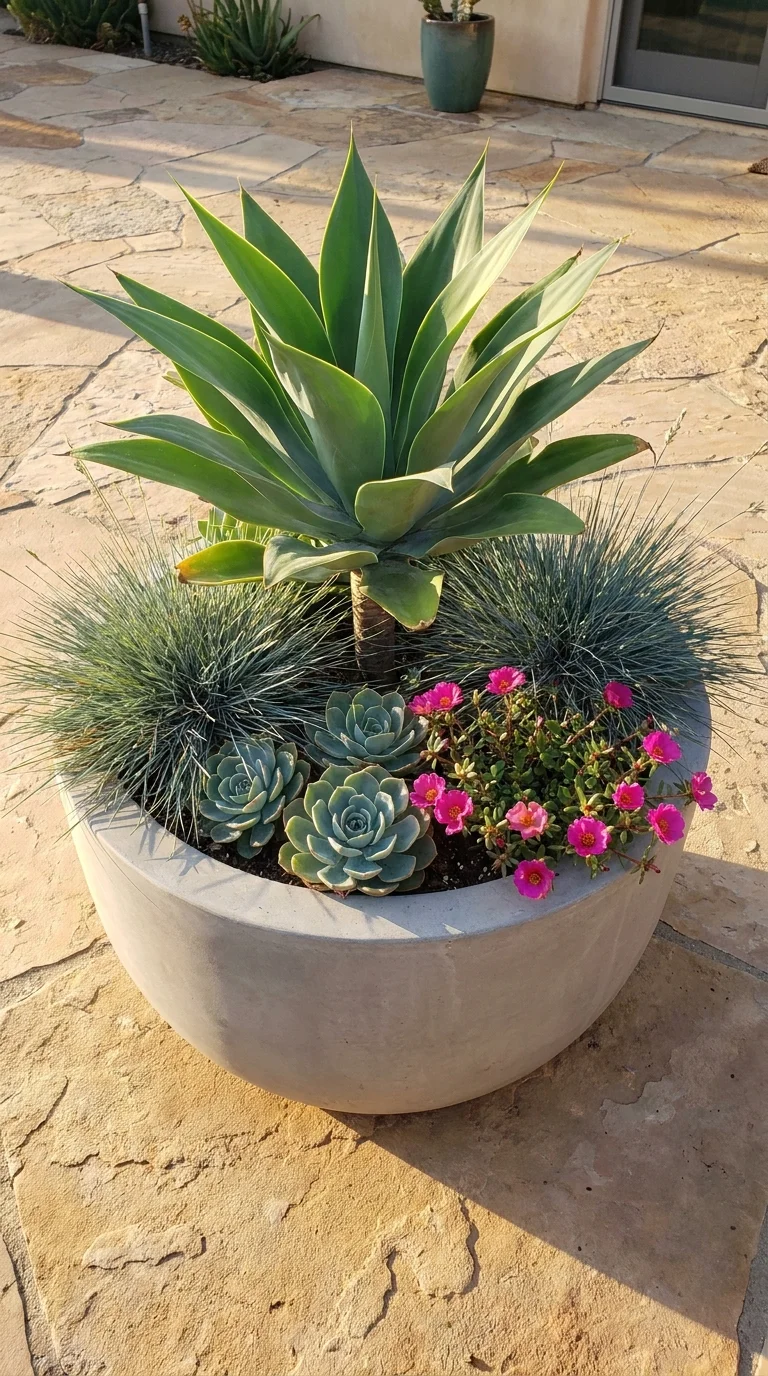
Here’s a controversial take: you don’t have to water every single day to have a beautiful full-sun planter. I spent years feeling guilty about missing watering days, like I was a bad plant parent. Then I discovered succulent and drought-tolerant container gardening, and it genuinely changed my summer.
This planter idea is for the realistic gardener — the one who travels, works long hours, or just sometimes forgets. It’s also genuinely beautiful in a modern, architectural kind of way.
The “Desert Chic” combo:
The star of this arrangement is Agave or Aloe as your thriller — big, sculptural, dramatic. One good-sized Agave in a pot is a statement piece on its own.
Around it, add:
- Sedum “Autumn Joy” — actually has gorgeous pink flowers in late summer
- Echeveria — the rosette-shaped succulents in silvery-blue or purple
- Portulaca — I keep mentioning this because it’s genuinely one of the best full-sun, drought-tolerant flowering plants out there. It closes at night and on cloudy days, but explodes with color in direct sun.
- Ornamental grasses — Blue Fescue is perfect for this aesthetic. It stays compact and has beautiful silvery-blue blades.
The soil setup matters a lot here: Don’t use regular potting mix for succulents in containers. Mix in about 30-40% perlite or coarse sand. The drainage needs to be excellent, or the roots will rot, which is the one thing that kills succulents.
Pot choice: For this aesthetic, go with concrete, stone-look resin, or unglazed terracotta. The texture and color palette of those materials pair perfectly with the desert plant vibe.
I have one of these planters by my front door — it literally goes weeks without water in summer (the succulents are storing moisture), and it still looks great. Guests always comment on it.
Idea 6: The Seasonal Color Swap Strategy

This one isn’t about a specific plant combination — it’s about a system that makes your small space look amazing year-round without requiring you to have a massive plant collection.
Here’s how it works: invest in 2-3 good-quality large planters that become permanent fixtures in your space. These are your “anchor” pots. Then you rotate the plants inside them seasonally.
The seasonal rotation for full sun:
Spring (cool season): Fill with snapdragons, pansies, stock, sweet alyssum, and cool-season herbs like cilantro and parsley. These love the sun but don’t handle summer heat. They’ll thrive from late March through May.
Early summer: Swap to heat-loving annuals — Zinnias, Marigolds, Lantana, Portulaca, Calibrachoa. This is your big color moment.
Late summer into fall: Transition to ornamental grasses, mums, sedum in bloom, and fall annuals. Ornamental Kale becomes a surprisingly good-looking planter plant as temperatures drop.
Winter (if you’re in a cold zone): Fill with evergreen branches, holly sprigs, ornamental cabbage, and seasonal decorative elements.
The investment logic: A lot of people resist this because they think it means spending money every season. But if you start seeds indoors (I use a basic seedling tray setup under a cheap grow light — nothing fancy), you can grow a lot of these plants for very little money. I typically spend about $15-20 per season on seeds and a flat of annual starts, and my planters look like they cost hundreds.
What I use to track this: I actually keep a simple note in my phone with what I planted, when, and what worked. It sounds extra, but after a couple of years, you have genuinely useful data about what thrives specifically in your space.
Idea 7: The Edible Container Garden — Beautiful and Functional

The best full-sun small space planter I’ve ever created wasn’t just decorative — it fed me.
Vegetables and fruiting plants need full sun. Most of them require 6-8 hours minimum. Your south-facing, blazing hot balcony or patio is actually ideal growing conditions for tomatoes, peppers, cucumbers, and herbs. What felt like a problem is actually prime real estate.
Here’s how to set this up in a small space without it looking like a messy vegetable patch:
Choose compact or “patio” varieties: This is non-negotiable in a small space. Regular indeterminate tomatoes will grow 5-6 feet tall and take over everything. Instead:
- Tomatoes: “Tumbling Tom” (trailing, perfect for a hanging basket), “Patio F1”, “Sweet ‘n’ Neat” series
- Peppers: Any pepper variety actually stays pretty compact
- Cucumbers: “Bush Pickle” or “Spacemaster” — they stay manageable
- Strawberries: “Alpine” strawberries are stunning in a planter and produce all summer
- Eggplant: The “Fairy Tale” variety is compact and gorgeous — purple and white striped fruits
Make it look intentional (not messy): Use beautiful containers. A terracotta pot with a tomato plant cascading over the edges can look genuinely lovely. I have “Tumbling Tom” in a hanging basket, and in summer it’s a ball of red tomatoes — it’s a showpiece.
Add some edible flowers around the base — Nasturtiums are full-sun, drought-tolerant, and the flowers are actually peppery and delicious in salads.
Use a tall planter with a built-in trellis or add bamboo stakes and train your plants upward. Vertical growing saves space and looks structured and intentional.
The watering reality check: Vegetable plants in containers in full sun need consistent moisture. Inconsistent watering causes blossom drop in tomatoes and peppers, and bitter cucumbers. I water my edible planters every morning in summer, sometimes in the evening too. A drip irrigation system — even a basic timer-controlled one from your outdoor tap — is worth looking into if you’re doing an edible garden. The Orbit B-hyve timer, paired with a drip kit, costs around $50 and handles it automatically.
The Soil and Feeding Setup That Ties All of This Together
This deserves its own section because I’ve seen so many people do everything right with plant selection and pot choice, then undermine it all with the wrong soil.
Don’t use garden soil in containers. I cannot stress this enough. Garden soil compacts, drains poorly, and can introduce pests and diseases. Always use a quality potting mix.
My full-sun container soil recipe:
- Start with a premium potting mix (I use Miracle-Gro Potting Mix or FoxFarm Ocean Forest — both are excellent)
- Add about 20% perlite for extra drainage
- For drought-tolerant or succulent planters, increase the perlite to 30-40%
- For vegetable planters, mix in some slow-release fertilizer granules at planting time (Osmocote is widely available and works well)
Feeding schedule: Plants in containers can’t pull nutrients from the surrounding soil the way in-ground plants can. You need to feed them regularly. I use a liquid fertilizer (tomato feed for edibles, a balanced flower fertilizer for ornamentals) every 10-14 days through the growing season. A lot of people skip this step and then wonder why their potted plants peter out in August.
Common Mistakes to Avoid (I’ve Made All of These)
1. Buying shade plants by accident. Always read the tag. “Partial sun” means 3-6 hours. “Full shade” means less than 3. If you’re in a full sun situation, you need plants that say “full sun” or at least “full sun to partial shade.”
2. Going too small on pot size. Small pots dry out incredibly fast in full sun. A 6-inch pot in full sun on a hot day can be bone dry within hours. Go bigger than you think you need. Bigger pots also give roots more room to grow, which means bigger, healthier plants.
3. Not watering consistently. Full sun = fast evaporation. Get into a watering routine. Morning is best — it gives leaves time to dry before evening (wet foliage overnight encourages fungal disease) and the water reaches the roots before peak afternoon heat.
4. Ignoring the color of your pots, dark pots absorb heat. In a full sun situation, this can literally overheat the roots and stress or kill plants. Lighter colored pots or materials with natural insulating properties (like thick terracotta) are better choices for hot, sunny exposures.
5. Planting too close together. It’s tempting to pack a pot densely for an instant full look, but overcrowded plants compete for water and nutrients and don’t grow as vigorously. Follow spacing recommendations on the plant tag, or at least give each plant slightly more space than you think it needs.
6. Forgetting to deadhead. Most annual flowers will stop blooming if you let them set seed. Deadheading (pinching or snipping off spent flowers) signals the plant to keep producing. Spend five minutes every few days doing this, and your planters will bloom dramatically longer.
Final Thoughts
I spent a couple of summers feeling frustrated with my balcony. I thought the intense sun was a problem to solve — something to work around with shade cloth or by clustering plants together.
It wasn’t until I leaned into it completely that things clicked. Full sun planters, when set up thoughtfully, are some of the most vibrant, productive, and rewarding small-space gardens you can create. They bloom longer than shady arrangements, attract more pollinators, and — if you go the edible route — actually feed you.
Start with one or two of these ideas rather than trying to implement all seven at once. See what your space does, notice where the light falls and at what time, pay attention to which plants seem happiest. Gardening in a small space is really just a series of small experiments, and every season you learn something new.
The fern is a distant memory. My south-facing balcony is now my favorite place to be in the summer. Yours can be too.
Have a specific full sun planter question? Drop it in the comments — I read everything and try to respond to everyone.

Shahid Nawaz is a home and garden content writer at Garden Skillz with over 4 years of experience researching and writing about gardening, plant care, and DIY home improvement. He specializes in turning complex horticultural topics into practical, easy-to-follow guides for beginners and experienced growers alike. Shahid has written extensively on flowering plants, indoor greenery, and seasonal garden care.