I still remember the afternoon my neighbor Karen pulled into her driveway, rolled down her window, and yelled across the street: “Your mailbox area looks like a bus stop.”
She wasn’t wrong.
There was my mailbox — a plain black metal post with a dented box on top — sitting in a patch of bare dirt surrounded by weeds. No flowers. No mulch. No nothing. Meanwhile, Karen had this gorgeous little garden around hers with lavender, creeping phlox, and a river rock border that made her whole front yard look like it was professionally landscaped.
That was the moment I realized: the mailbox area is the first thing people see when they drive past your house. It’s like the cover of a book. And mine was saying, “Nobody cares here.”
So I went down a deep rabbit hole — Pinterest boards, YouTube videos, trips to the local nursery, and a whole lot of trial and error over three seasons. I’ve since completely transformed my mailbox area three times, and I’ve helped four neighbors do theirs, too.
Here’s everything I’ve learned about mailbox landscaping, broken down into 10 beautiful designs that actually work in real life — not just in magazine photos.
Why Mailbox Landscaping Matters More Than You Think?
Before we dive into the designs, let me be straight with you: most people wildly underestimate how much the mailbox area affects curb appeal.
Real estate agents actually talk about this. A tidy, well-planted mailbox garden can make a buyer slow down and take a second look at your house. On the flip side, a neglected mailbox screams, “The rest of the yard is probably a mess too.”
And here’s the thing — it’s one of the cheapest, fastest curb appeal upgrades you can do. A bag of mulch, a flat of annuals, and a Sunday afternoon can completely change how your house looks from the street.
The goal isn’t to go overboard. It’s to make the space look intentional. Like someone actually thought about it.
Design #1: The Classic Cottage Flower Bed

This is the one that got me started, and honestly, it’s hard to beat.
The idea is simple: surround the base of your mailbox post with a small, kidney-shaped or oval flower bed. Edge it with something clean — brick pavers, black metal edging, or even just a crisp cut with a spade — and fill it with cottage-style flowers.
For the actual plants, I’ve had the best luck with:
- Knockout roses — they bloom from spring through fall, they’re tough, and they look absolutely gorgeous around a mailbox
- Black-eyed Susans — native to most of the US, drought-tolerant, and they come back every year
- Salvia — purple or red, bees love it, and it stays tidy
- Creeping phlox — for the edges, it spills over beautifully and flowers like crazy in spring
The key mistake I made the first time? I planted everything too close together. I was impatient and wanted it to look full immediately. By July, everything was fighting for space, and the middle plants were getting choked out.
Give your plants room to breathe. They’ll fill in by the second season, I promise.
Quick tip: When you’re laying out the bed, use a garden hose to trace the shape before you cut. It sounds basic, but it saves you from committing to a shape you don’t love.
Design #2: The Low-Maintenance Mulch and Shrub Look

Not everyone has time to deadhead flowers and water twice a week. I get it. Life gets busy.
This design is perfect for people who want something that looks polished but practically takes care of itself.
The formula: one or two small evergreen shrubs flanking the mailbox post, a clean layer of dark mulch (I use double-shredded hardwood), and a simple edging border.
Good shrub choices for this look:
- Dwarf boxwoods — classic, tidy, evergreen. They hold their shape without much pruning.
- Little Lime hydrangeas — smaller than the full-size variety, bloom in summer and fall, and the dried flowers look beautiful even in winter.
- Spirea — incredibly low maintenance, blooms in pink or white, and turns gorgeous colors in fall.
- Ornamental grasses — Karl Foerster feather reed grass is amazing for this. Tall, architectural, and almost zero care.
The mulch is doing more work than people realize. Fresh dark mulch makes every plant look more intentional. I refresh mine every spring — one bag is usually enough for a mailbox area — and it immediately makes the whole front yard look cared for.
Lesson learned the hard way: Don’t pile mulch up against the post or against plant stems. That “volcano mulching” look you see everywhere actually rots wood and kills plants slowly. Keep it 2–3 inches thick and away from stems.
Design #3: The Rock Garden Mailbox

I fell in love with this style after visiting a friend in Colorado, where watering restrictions make traditional flower beds almost impossible.
The concept: use decorative rocks, river stones, or landscape gravel as the main ground cover, and tuck in drought-tolerant plants that look like they belong in a natural setting.
Plants that absolutely thrive in this setup:
- Sedum (stonecrop) — comes in dozens of colors, spreads slowly, flowers in fall
- Hens and chicks (sempervivum) — almost indestructible, spreads on its own, looks sculptural
- Russian sage — tall, silver-blue, gorgeous, and loves hot, dry conditions
- Agave or yucca — if you’re in a warm climate, these add serious drama
For the rocks, I’d suggest going to a local landscape supply yard rather than buying bags from a big box store. You’ll get a much better variety and price per ton. Bring a photo of your mailbox and describe your house style — the staff is usually genuinely helpful in pointing you toward the right stone.
This style works especially well with brick or stone homes. The materials echo each other, and it looks like the whole property was designed together.
Design #4: The Climbing Vine Post

Here’s one that people always stop to comment on, but it takes a bit more patience to pull off.
The idea is to grow a climbing vine up the mailbox post itself, so the post becomes part of the garden rather than just a utilitarian object sticking out of the ground.
The best vines I’ve seen used for this:
- Climbing roses — absolutely stunning, but they need support and annual pruning
- Clematis — this is my personal favorite for mailboxes. It blooms heavily, isn’t overly aggressive, and comes in purple, pink, white, and red. ‘Jackmanii’ is a classic.
- Sweet autumn clematis — covers fast, smells incredible in late summer, but be warned: it self-seeds aggressively. You’ll be pulling seedlings the next year.
- Annual morning glories — if you want something fast and easy that you replant each year, these are hard to beat
You’ll need to help the vine find the post at first. I use small zip ties or soft garden tape to guide the new growth in the direction I want it to go. After a season, it figures things out on its own.
One thing to watch: don’t let vines grow into the mailbox door mechanism or around any moving parts. Trim them back from the opening regularly. My clematis once grew so enthusiastically that the mail carrier had to push through leaves to deliver my packages. She was not amused.
Design #5: The Symmetrical Formal Pair

If your house has a more traditional or colonial style, this design looks incredibly polished.
The concept is strict symmetry: two identical plantings, one on each side of the mailbox post, perfectly mirrored.
What works well in formal pairs:
- Matching topiaries — boxwood balls or spirals in matching containers look expensive, but are actually pretty affordable from most nurseries
- Twin ornamental grasses — same variety, same size, planted at the same time, so they grow at the same rate
- Matching urns or planters — if your post is freestanding, you can flank it with two large container planters with identical arrangements
- Liriope (lilyturf) — low, mounding, evergreen in mild climates, and tidy enough for a formal look
The secret to making this work is commitment to symmetry. If one plant gets bigger than the other, trim it back. If one dies, replace it immediately with the same variety at the same size. Lopsided “symmetry” looks worse than no symmetry at all.
I’ve seen homeowners do this with two stone urns flanking the post, filled seasonally with different arrangements — spring bulbs, summer flowers, fall mums, and winter evergreen cuttings. It looks magazine-worthy every single season.
Design #6: The Wildflower Meadow Patch
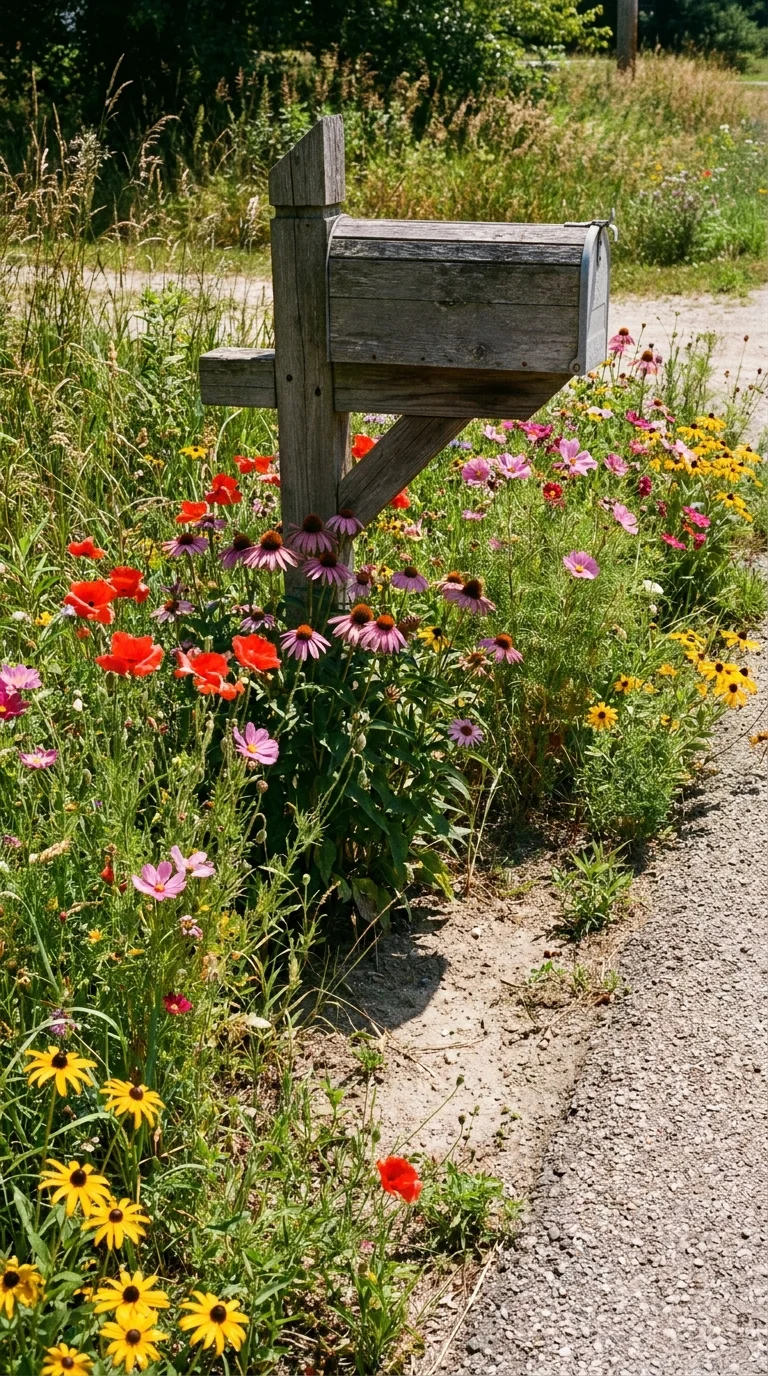
This one is for the person who wants something beautiful but also wants to spend zero time maintaining it after Year One.
The idea: broadcast a wildflower seed mix around the mailbox base, let it naturalize, and embrace the gorgeous chaos.
A few things I’d tell you before you try this:
First, not all wildflower seed mixes are equal. The cheap ones from the dollar store are mostly annuals that look great the first year and then disappear. Look for mixes that include native perennials for your region. My favorites are the ones from American Meadows (they have region-specific mixes, which makes a big difference).
Second, prep the soil properly first. Wildflowers aren’t magic — they need good seed-to-soil contact. Clear the area, loosen the top inch or two of soil, scatter the seeds, and tamp them down with your foot or the back of a rake.
Third, it’ll look like weeds the first spring. Resist the urge to pull everything. I almost killed my own wildflower patch because I didn’t recognize the seedlings and assumed they were weeds.
By mid-summer of the first year, this design looks breathtaking — poppies, coneflowers, cosmos, bachelor’s buttons all tumbling together. And from the second year on, it largely takes care of itself, reseeding each fall naturally.
Great for: cottage-style homes, farmhouses, properties with a natural/rustic aesthetic.
Design #7: The Brick or Stone Raised Bed

This is a bigger weekend project, but the payoff is enormous. A small raised bed built around the mailbox post looks permanent and high-end, like it was designed by a professional.
Materials I’ve seen work beautifully:
- Stacked natural stone — no mortar needed if you’re doing a low border (3–4 stones high). Looks incredibly natural and ages beautifully.
- Brick — more formal, great for colonial or traditional homes. You can usually find reclaimed bricks cheaply at a salvage yard, and they look better than new ones.
- Concrete retaining wall blocks — fast, affordable, and they interlock without mortar. Brands like Allan Block or Versa-Lok have some really nice-looking options.
- Railroad ties or landscape timbers — rustic, farmhouse-appropriate, but they do eventually rot and need replacing
Build the bed about 6–8 inches high, fill it with good-quality garden soil mixed with compost, and then plant into it just like any other raised bed.
The elevated soil warms up faster in spring, drains better than in-ground beds, and the structure keeps mulch and plants from spilling out onto the grass. It also makes the mailbox look anchored, as it belongs there.
Pro tip: When you’re building, make sure the bed doesn’t interfere with mowing. Leave a small gap between the edge of the bed and the start of your lawn if possible, or edge it with something that a weed trimmer can work up against easily.
Design #8: The Seasonal Container Garden

Some people have a mailbox mounted on a wall, a fence post, or a structural column that doesn’t lend itself to in-ground planting. This design is for you.
The solution: a pair of large, heavy containers (or one very large one) placed at the base or flanking the mailbox. Replant them each season for a look that’s always fresh.
For containers to work well at a mailbox, they need to be:
Heavy enough that they don’t blow over in the wind. I learned this the hard way when a summer storm tipped over my terracotta pots and smashed them. Now I use heavy cast-iron-look resin planters or concrete containers.
Large enough to hold moisture longer. Small pots dry out incredibly fast, especially in the sun. I use nothing smaller than a 16-inch diameter pot for a mailbox planting.
Seasonal plant combos that work:
- Spring: tulip bulbs forced in fall, violas, snapdragons
- Summer: mandevilla (the vine trails beautifully), petunias, sweet potato vine, geraniums
- Fall: mums, ornamental kale, flowering cabbage, crotons for color
- Winter: evergreen branches, red-twig dogwood stems, pinecones, berry branches
The “thriller, filler, spiller” formula works perfectly here. Thriller = something tall and dramatic in the center. Filler = mounding plants in the middle. Spiller = something that trails over the edge. It gives every container planting a professional, intentional look.
Design #9: The Lamppost and Mailbox Combo Garden

Some properties have both a lamppost and a mailbox near the street — usually within a few feet of each other. This is actually an amazing opportunity to create one unified garden bed that ties both structures together.
Instead of treating them separately, design one flowing bed that encompasses both, connects them visually, and makes the whole entry area feel like one cohesive design.
Tips for making this work:
Use taller plants near the lamppost (it’s usually the taller of the two structures) and graduate down to lower plants near the mailbox. This creates a natural visual flow.
Think about what’s visible from inside the house, not just from the street. If you can see this area from your living room window, make sure it looks good from that angle too.
At night, the lamppost will backlight your plants — this is stunning with ornamental grasses, which glow when lit from behind, or with plants that have silver or light-colored foliage.
Some beautiful combos I’ve seen:
- Ornamental grass + black-eyed Susans + creeping Jenny at the edges
- Climbing rose on the lamppost + salvia + catmint spilling over the edge
- Karl Foerster grass + cone flowers + sedum ‘Autumn Joy’
This is honestly one of the most impactful mailbox landscaping upgrades possible when you have the lamppost to work with. It goes from looking like two random structures to looking like a designed entry garden.
Design #10: The Four-Season Interest Garden

This is the most thoughtful design on the list, and it takes the most planning — but it means your mailbox area looks beautiful every single month of the year, not just in June.
The challenge most people face: they plant for summer and then have a dead-looking patch from October to April. The four-season garden solves that by layering plants with different peak seasons.
Here’s how to build the layering:
Winter interest:
- Evergreen groundcover (pachysandra, ajuga, or vinca)
- Ornamental grasses (leave them standing through winter — they look beautiful with frost)
- Red-twig dogwood shrubs (the bare red stems are gorgeous against snow)
Spring:
- Tulip and daffodil bulbs planted in fall (they’ll come up through the groundcover beautifully)
- Creeping phlox
- Brunnera (heart-shaped silver-splashed leaves starting in early spring)
Summer:
- Black-eyed Susans, coneflowers, salvia, daylilies
- These bridge spring and fall and carry the heavy lifting of the season
Fall:
- Sedum ‘Autumn Joy’ (turns deep rose-pink in September)
- Ornamental grasses feathering out with their seed heads
- Asters (underused and underrated — they bloom heavily when everything else is winding down)
Plant this bed once thoughtfully, and you’ll have something beautiful every single time you pull into your driveway for years to come.
Tools and Supplies I Actually Use
Since we’re being real here, let me tell you what’s actually in my garage:
For edging: A half-moon edging spade is worth every penny. It creates a much cleaner cut than a regular spade. I have a True Temper brand one I’ve used for five years.
For mulch: I order mine by the yard from a local landscape supply company. It’s much cheaper than bagged, and I can get better quality. One cubic yard usually does a good mailbox bed with some left over.
For planning, I use the iScape app on my phone to visualize plants before I buy them. You take a photo of your space and drag plants into it. It’s not perfect, but it helps.
For plant selection, I always check the Proven Winners website before buying. Their plant finder lets you filter by sun, water needs, and mature size. I’ve stopped buying plants just because they look pretty at the nursery — that’s how I ended up with a 6-foot-tall plant in a 2-foot space.
For soil: Especially in raised beds and containers, I use a mix of bagged garden soil and compost. Straight topsoil from the yard is usually too compacted and lacks nutrition.
Mistakes I’ve Made (So You Don’t Have To)
Look, I’ve been doing this long enough to make some spectacular errors. Here are the ones that cost me the most time and money:
Planting without checking the mature size. I planted Knock Out roses once, not realizing they’d get 4 feet wide. They completely swallowed the mailbox within two seasons. Always read the plant tag and take it seriously.
Ignoring sun exposure. My mailbox is in full sun, and I once planted impatiens because they were cheap and pretty. They were dead by July. Know your sun situation before you buy anything.
Skipping the edging. The first season, I didn’t edge my bed properly, and the grass crept in from all sides. By mid-summer, it looked like a mess. A clean edge changes everything.
Buying the cheapest mulch. I once bought a very cheap dyed red mulch, and it looked terrible — fake and garish. It also faded to a weird pink-orange by August. Dark natural mulch almost always looks better.
Planting at the wrong time. I planted a bed in mid-August one year during a heat wave. Half the plants went into shock and died. Late spring or early fall are the best times to plant new perennials.
How to Pick the Right Design for Your House?
Before you go buy anything, stand on the street and look at your house honestly.
What’s the architectural style? A wildflower meadow looks amazing in front of a farmhouse, but wrong in front of a formal Georgian colonial. The symmetrical formal design would look stiff in front of a craftsman bungalow.
What’s your maintenance willingness — really? Don’t design a high-maintenance flower bed if you’re barely keeping up with mowing. Pick something that matches your real life, not your aspirational life.
What’s your climate? I can’t say this enough. Don’t fall in love with a design that uses plants that won’t survive your winters or summers. Check your USDA hardiness zone (you can look it up by zip code at the USDA website) and buy accordingly.
What’s your budget? A basic design with mulch and a few perennials can be done for $50–100. A formal raised bed with stone and mature shrubs might be $300–500. There’s something beautiful at every price point.
One Last Thing
The neighbor who called my mailbox a bus stop — Karen — she actually asked me for advice on her mailbox garden last fall. She wanted to update it from the lavender (which was getting woody and bare in the center) to something more interesting for four seasons.
I helped her plan a small raised bed with Karl Foerster grass, autumn sedum, and creeping phlox for spring color. We planted it on a Saturday in September.
By the following May, it already looked established. By September, when the grass was feathering out, and the sedum turned that deep rose-pink, she texted me a photo with just a single emoji: 🥹
That’s the thing about mailbox landscaping. It’s a small project. It’s a tiny piece of ground. But it’s the first thing you see when you come home every day. It sets the tone for the whole property. And when it’s done right — when you pull up, and there’s something beautiful and alive growing there — it just feels good.
Totally worth a Sunday afternoon and a bag of mulch.
Have questions about a specific design or your particular mailbox situation? Drop them in the comments — I actually read and respond to every one.

Shahid Nawaz is a home and garden content writer at Garden Skillz with over 4 years of experience researching and writing about gardening, plant care, and DIY home improvement. He specializes in turning complex horticultural topics into practical, easy-to-follow guides for beginners and experienced growers alike. Shahid has written extensively on flowering plants, indoor greenery, and seasonal garden care.