I still remember the summer I decided to grow hostas in pots for the first time. I had this gorgeous shaded corner on my back porch — the kind of spot that gets barely any sun all day — and I thought, hostas are basically made for this. I’d seen them thrive in my neighbor’s yard for years. Big, lush, dramatic leaves in every shade of green and blue imaginable. I figured container growing would be even easier since I could control everything.
Three months later, I had two sad, crispy, half-dead plants sitting in cracked soil that had pulled away from the edges of the pot.
I was genuinely baffled. Hostas are supposed to be the most forgiving plant out there. People call them “the lazy gardener’s best friend.” So what was I doing wrong?
Turns out, quite a lot. And after years of experimenting, reading, asking other gardeners, and killing more hostas than I care to admit, I finally figured it out. The problems weren’t random bad luck — they were the same five mistakes over and over again. And the frustrating part? None of them were obvious until I really knew what to look for.
If your hostas in pots are struggling, looking sad, or just not growing the way you expected, I want to save you the same headaches I went through. Let’s get into it.
Reason #1: The Pot Is Too Small (And It’s Starving the Roots)
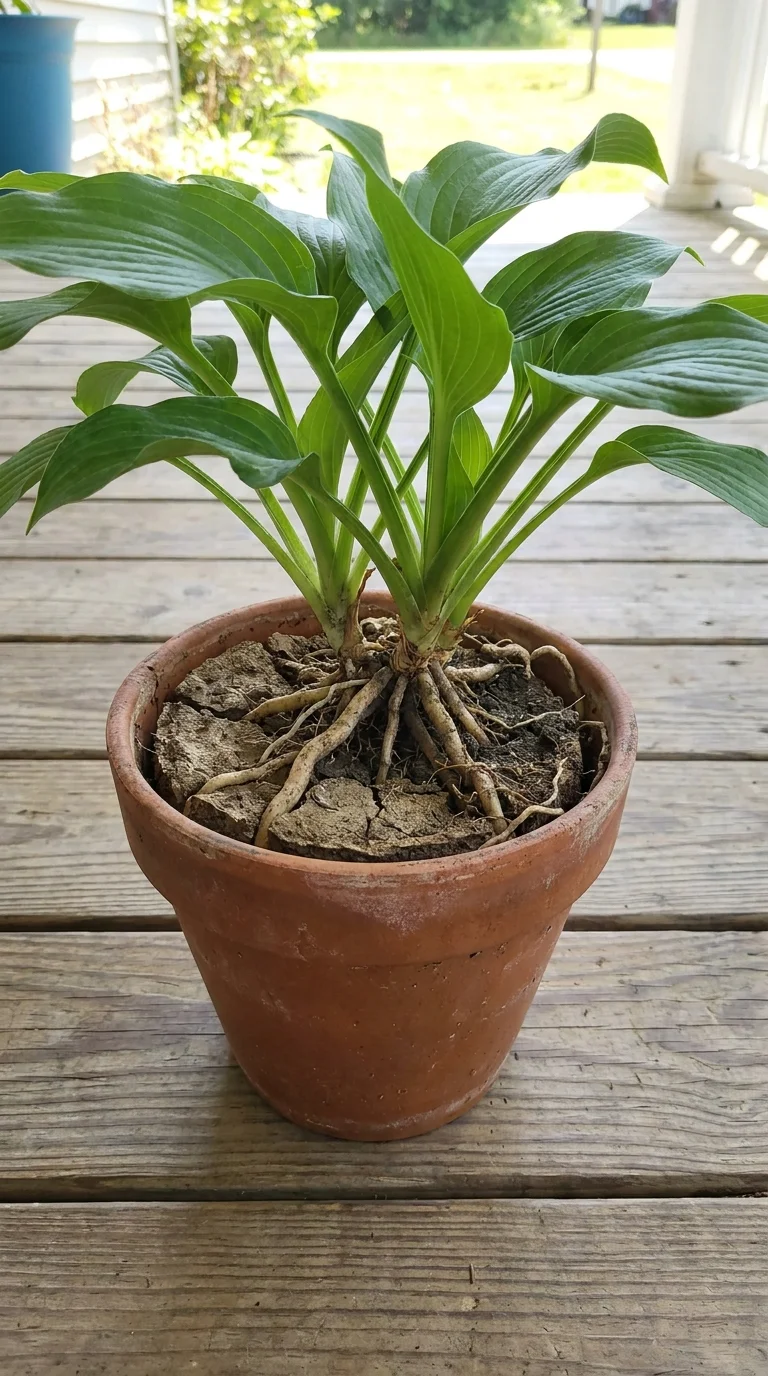
This was my very first mistake, and honestly, the most common one I see other gardeners make too.
I planted my first hosta in what I thought was a reasonably sized pot — maybe 10 inches wide. It looked fine at first. But by mid-summer, the leaves were smaller than they should have been, the plant wasn’t spreading at all, and every time I stuck my finger in the soil, it was bone dry within 24 hours of watering.
The problem: hostas are root-hungry plants. In the ground, their roots spread wide and deep. When you put them in a container, you’re basically asking them to do the same job in a much tighter space. Too small a pot means the roots get cramped fast, the soil dries out almost immediately (because the roots are competing for every drop of moisture), and the plant spends all its energy just trying to survive rather than putting out those gorgeous big leaves you were hoping for.
What to do instead:
For a single medium-sized hosta, you want a pot that’s at least 16–18 inches wide and about 12 inches deep. For a large variety like ‘Sum and Substance’ or ‘Empress Wu’, go bigger — a 24-inch-wide pot isn’t overkill at all.
A good rule of thumb: the pot should be roughly twice the width of the plant’s mature spread. Yes, it might look a little ridiculous when the plant is small and new. That’s fine. It’ll fill in.
Also, think about the shape of the pot. Wide and shallow is better than narrow and deep for hostas. Their roots spread out laterally more than they dive down.
One more thing — heavy clay or ceramic pots hold moisture better than thin plastic ones. If you’re in a hot climate or your pots dry out fast, go with a heavier material. The terracotta pots that look so pretty can actually pull moisture OUT of the soil, which doesn’t help at all when you’re already fighting the drying problem.
Reason #2: The Soil Is Wrong — And This Matters More Than You Think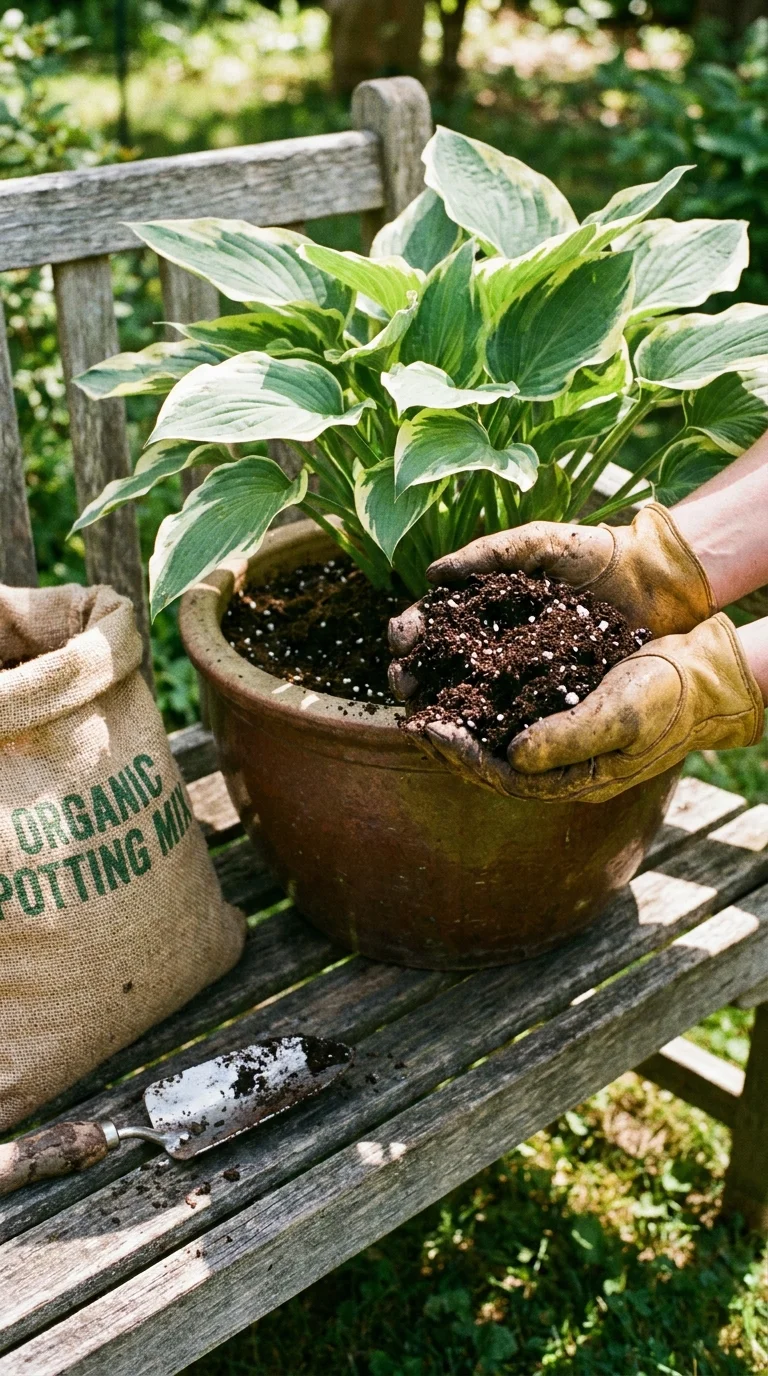
Here’s something that surprised me when I first learned it: the regular potting mix you grab off the shelf at your local garden center is usually not ideal for hostas in pots. Not because it’s terrible, but because it’s often not rich enough, and it can compact over time in ways that choke out the roots.
Most standard potting mixes are pretty lightweight. They’re designed for annuals and general use — plants that have a short life in a container and don’t ask much from the soil. Hostas, on the other hand, are perennials that will live in that same pot for years. They need soil that can sustain long-term root health, drain well enough to prevent rot, but also hold onto enough moisture and nutrients to keep those big leaves fed.
When I switched to making my own mix — or at least upgrading what I bought — the difference in my hostas was night and day within one growing season.
My go-to potting mix for hostas:
Take a good-quality potting mix as your base (something with compost in it, not just peat and perlite). Then mix in:
- About 20–25% compost or aged leaf mold (hostas love organic matter — it’s what they get in the wild from years of decomposing leaves on the forest floor)
- A handful of perlite to improve drainage and prevent compaction
- Optionally, a slow-release granular fertilizer was worked into the mix at planting time
The goal is soil that feels light and fluffy, drains within a few seconds when you pour water on it, but still holds some moisture rather than running right through. If water shoots straight through your pot like it’s barely touching the soil, your mix is too loose. If it pools on top for a long time before soaking in, it’s too dense.
One thing I’ve noticed: hostas in pots benefit from a soil refresh every 2–3 years. The soil breaks down over time, compacts, and loses its structure. When you see roots creeping out of the drainage holes at the bottom, or when the soil surface has sunk several inches below the rim, it’s time to either repot entirely or at least top-dress with fresh compost.
Reason #3: They’re Getting Way Too Much Sun (Yes, Even If You Think It’s Shade)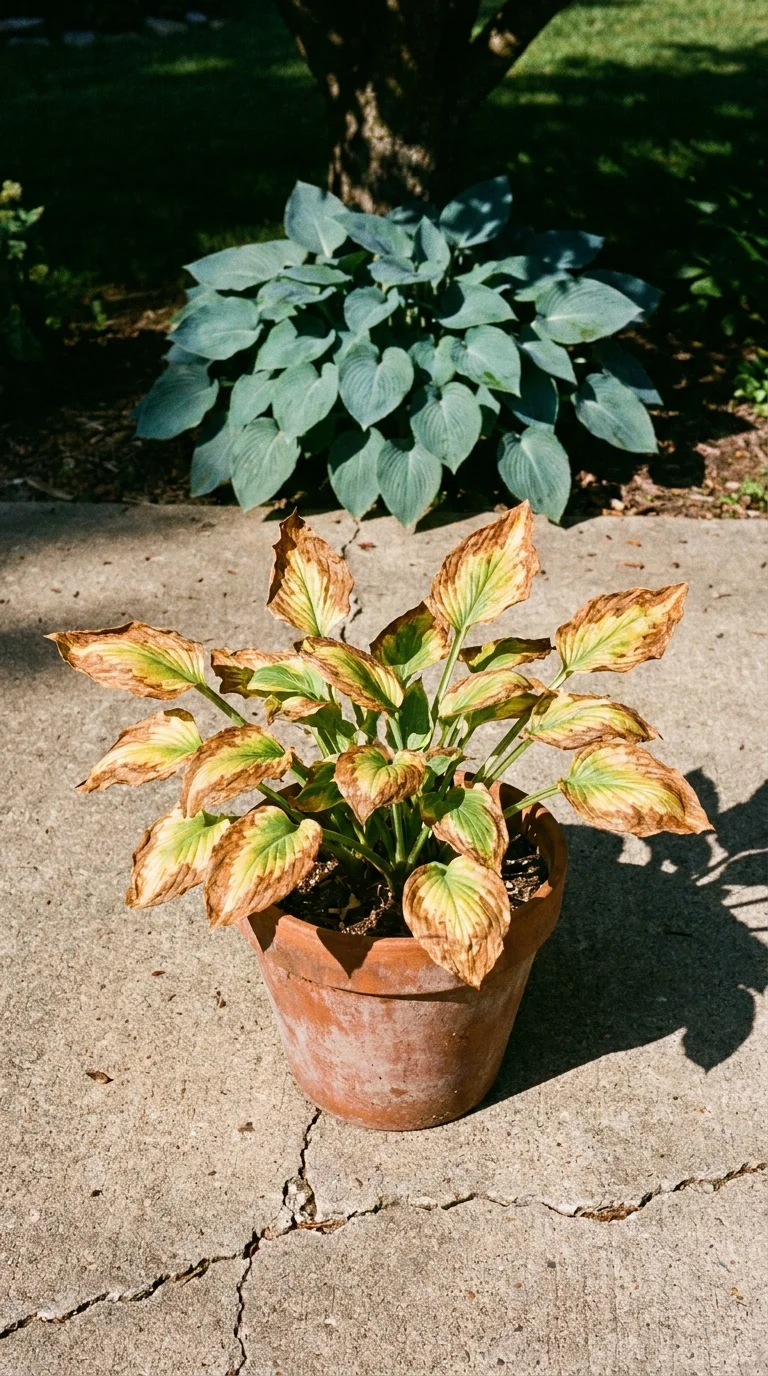
This one tripped me up for an embarrassingly long time. I knew hostas liked shade. I put them in what I thought was a shady spot. They still scorched.
The thing about shade is that it’s not as simple as “sun or no sun.” There’s deep shade (under a dense tree canopy or on a north-facing wall), partial shade (a few hours of morning sun and shade the rest of the day), and then there’s “dappled shade,” which is that filtered light through leaves. Most hostas are genuinely partial to deep shade. But a few hours of direct afternoon sun — especially in summer when the sun is high and intense — can absolutely fry them.
The issue with pots specifically is that they intensify everything. The soil heats up faster than in-ground soil. The roots can’t escape downward into cooler earth. So when the afternoon sun hits, the pot itself becomes almost like a little oven, and even a hosta that would survive that same light in the ground might struggle in a container.
Signs your hosta is getting too much sun:
- Leaf edges turning brown and crispy (this looks like underwatering, but watering more won’t fix it if the sun is the real issue)
- Leaves that look faded or washed out — that rich blue-green turning yellowish
- Leaf tips are browning even when the soil feels moist
- The plant is staying small and not putting out new leaves, even in spring
What I actually do:
I time my sun exposure carefully now. My hostas in pots get morning sun — usually an hour or two — and then shade from about 11 AM onward. That seems to be the sweet spot. Morning sun is gentler; it warms the plant up and encourages growth. But they’re protected from the harsh afternoon rays.
If you can’t control the sun angle (maybe your porch or patio is fixed), try moving pots to different spots throughout the season. Yes, it sounds like extra work. But hostas in pots are moveable — that’s actually one of the best things about growing them in containers. Use that to your advantage.
Also, darker-leaved hostas (the deep blue and forest green ones like ‘Halcyon’ or ‘Blue Angel’) tend to handle more shade better than the lighter or variegated types, which often want a little more light to keep their colors bright. Know your variety.
Reason #4: Watering Is Off — Either Too Much or Too Little (And People Almost Always Guess Wrong)
Let me be honest: I’ve killed hostas from both overwatering AND underwatering. Both mistakes look surprisingly similar at first — the plant just looks sad, droopy, and unhappy. Which is incredibly unhelpful when you’re trying to diagnose the problem.
Here’s the key difference:
Overwatered hostas usually show yellowing leaves (especially lower leaves), soft or mushy stems near the base, and a soil that smells a bit musty or sour. If you pull the plant out, the roots may look brown and slimy rather than white and firm. Root rot is the real killer here, and it often happens silently until the plant is already in serious trouble.
Underwatered hostas show wilting, but the leaves tend to go crispy rather than soft. The soil pulls away from the edges of the pot. The leaves may curl inward. And the whole plant has a dry, papery feel rather than the lush, waxy feel of a healthy hosta.
The challenge with pots is that they dry out much faster than in-ground planting — especially in summer, and especially in smaller containers. In the heat of July and August, I water my hostas in pots almost every day. Sometimes twice on really hot days if the pot is in a spot that gets more sun than I’d like.
My watering system that actually works:
I don’t go by schedule. I go by feel. Stick your finger about 2 inches into the soil. If it feels dry at that depth, water deeply — keep going until water runs freely out the drainage holes. If it still feels damp at 2 inches, leave it alone.
Deep watering is much better than shallow, frequent watering. Shallow watering keeps the top of the soil moist while the roots deeper down stay dry. You want to encourage roots to grow downward, and that means getting water all the way through the pot.
A few things that help with consistent moisture:
- Self-watering pots have a reservoir at the bottom that wicks water up as needed. Honestly, a game changer for hostas, especially if you travel or forget to water regularly.
- Mulch on top of the soil — even in a container. A thin layer of bark chips or dried leaves on the soil surface slows down evaporation dramatically. I started doing this a couple of years ago, and it cut my watering frequency almost in half during summer.
- Drip irrigation setups — for people with multiple containers, a simple drip timer setup from a garden store (or Amazon) can automate most of the work. I use a basic Raindrip timer setup for my back porch pots, and it’s been completely worth it.
And please, please make sure your pots have drainage holes. I know that sounds obvious, but I’ve seen people put plants in decorative containers with no drainage and then wonder why everything keeps dying. Water sitting at the bottom of a sealed pot = root rot. No exceptions.
Reason #5: You’re Skipping Fertilizing (Or Doing It at the Wrong Time)
This one surprises a lot of people because hostas have a reputation for being low-maintenance, and they kind of are — in the ground. In the ground, they can tap into nutrients in the surrounding soil, benefit from earthworms breaking down organic matter, and generally feed themselves pretty well with minimal intervention.
In a pot? They can only eat what you give them.
Every time you water a container plant, you’re also slowly flushing nutrients out through those drainage holes. Over weeks and months, the soil becomes increasingly depleted. A hosta that started in a rich potting mix in spring can be running on fumes by July.
The result: slow growth, smaller leaves than the variety should produce, dull coloring, and a plant that just looks tired even when it’s getting enough sun and water.
How I fertilize hostas in pots:
I use a two-pronged approach. At planting time (or at the start of each spring when I’m refreshing the soil), I work a slow-release granular fertilizer into the top few inches of soil. I use something balanced — a 10-10-10 or similar ratio works fine. This gives a steady baseline of nutrients for the first couple of months.
Then, starting in late spring and through midsummer, I supplement with a liquid fertilizer every 2–3 weeks. I’ve had good results with fish emulsion (yes, it smells, but the plants love it) and also with a diluted liquid seaweed fertilizer, which seems to help with overall plant vigor and stress resistance.
The most important timing rule:
Stop fertilizing by mid-to-late summer. I usually cut off around late July or early August. Hostas need to start winding down and hardening off their growth before winter. If you keep pushing them with fertilizer late in the season, you encourage tender new growth that won’t have time to toughen up before frost arrives. That soft new growth gets hit hard by cold and can actually damage the plant’s ability to overwinter successfully.
Also — and this is a mistake I made early on — don’t fertilize a stressed or dry plant. Always water first, then fertilize. Applying fertilizer to dry roots can cause fertilizer burn, which shows up as brown, scorched leaf edges that look disturbingly similar to sun scorch. Hydrate first, then feed.
A Few Extra Things That Helped Me (That Nobody Talks About Enough)
Beyond the big five reasons above, a couple of smaller things made a real difference once I sorted out the main issues.
Dividing when the plant gets rootbound. After a few years, even a properly sized pot will fill up with roots. When this happens, the plant stalls — it just stops growing much at all. The fix is to divide the hosta. Spring is the best time, just as the tips are poking through the soil. Dig the whole clump out, split it into sections with a sharp knife or shovel, and repot each section into fresh soil. It feels brutal, but the plants bounce back fast and come back stronger.
Protecting from slugs. Hostas in pots are actually a little better protected from slugs than in-ground hostas, but not immune. If you’re seeing irregular holes chewed through the leaves (especially noticeable after a rainy stretch), slugs are your culprit. I scatter a ring of diatomaceous earth around the base of my pots, which deters them pretty effectively without any chemicals.
Overwintering. This is one place where hostas in pots are actually MORE vulnerable than in-ground hostas. The roots in a pot are not insulated by surrounding soil the way in-ground roots are. In cold climates, a pot full of frozen roots can mean a dead plant come spring. I move my hosta pots into an unheated garage for winter once the foliage has died back. They don’t need light in dormancy — just protection from hard freezes.
The Moment It All Clicked for Me
There was a summer — maybe four years into my hosta obsession — when everything finally came together. I had a cluster of seven hostas in pots on my porch, different varieties, different sizes of pots. All of them were lush, full, putting out leaves bigger than I’d ever managed before.
A neighbor stopped by and asked what my secret was.
I laughed a little because the “secret” was just finally learning from all the dumb mistakes I’d made. Bigger pots. Better soil. Real shade from the afternoon sun. Consistent deep watering. Actually feeding them through the season.
None of it is magic. It’s just understanding what hostas actually need when you take them out of their natural environment and ask them to live in a container. They’re forgiving plants — much more forgiving than most. But even forgiving plants have their limits.
If your hostas in pots are struggling right now, I’d start by diagnosing which of these five reasons is most likely the culprit. In my experience, pot size and watering are the most common first-time mistakes. Sun exposure is the sneaky one that catches experienced gardeners off guard. Soil quality and fertilizing tend to be the slow-burn problems that sneak up on you after a season or two.
Go back to basics. Be honest with yourself about what you might be skipping. And give the plant what it actually needs rather than what’s convenient.
Hostas in pots, when done right, are genuinely one of the most rewarding container plants you can grow. That lush, architectural foliage, the way the leaves catch raindrops, the drama they bring to a shaded corner — it’s all worth it.
You’ve just got to stop doing the things that are quietly killing them.
Have you struggled with hostas in pots? Drop a comment below — I’d love to hear what problems you’ve run into and what finally worked for you. Sometimes the best tips come from other gardeners figuring things out the hard way, just like me.

Shahid Nawaz is a home and garden content writer at Garden Skillz with over 4 years of experience researching and writing about gardening, plant care, and DIY home improvement. He specializes in turning complex horticultural topics into practical, easy-to-follow guides for beginners and experienced growers alike. Shahid has written extensively on flowering plants, indoor greenery, and seasonal garden care.